Showing posts with label Painting. Show all posts

Thursday, April 26, 2012

Dragon Forge Bases Tutorial

Painting Dragon Forge 'Lost Empires' and 'Parched Earth' bases.


Continuing my irregular series about bases, basing and well general tips I will take you through the process I use to paint the two types of bases I use. I use these for my Grey Knights and Skitarii respectively, however at some point I am going to modify some to combine elements of the two so it doesn't look weird if I field the two armies together in an Apocalypse game. Also you may notice that I use, almost exclusively, the old GW paint colours. Feel free to swap them for their current near match brethren.
So leading Straight on from this post:
At this point you should have your bases cleaned and primed, as per my previous post. From here I am going to walk through the steps I take to paint the two types of bases.


First up the 'Parched Earth' bases:

This method is a fairly fast way to paint these well balanced and very detailed bases. I chose to do them slightly darker tones to balance out the bright steel, white and red colours that dominate the colour scheme of my Grey Knights. To make them more traditional sulphur desert coloured you could perhaps swap the Charadon Granite for Iyanden Darksun and the Devlan Mud for Gryphonne Sepia.


1) Thin down some Charadon Granite so that it is about the same consistency as paint you would airbrush with. Liberally wash this into the cracks in the base. Once this is dry sticky brush the base with 1:2 Reaper Dark Blood:Charadon Granite (Base Mix).


2) Sticky brush the base with 1:2 Deneb Stone:Base Mix.


3) Heavily Drybrush patches with 2:1 Deneb Stone:Charadon  Granite. The Idea here is to add natural looking changes to the colour of the ground just like real soil. Final Drybrush highlight in patches with Deneb Stone.


4) Paint any metal junk with Boltgun Metal and pick out any rocks with a Heavy Drybrush of Adeptus Battlegrey.


5) Stipple the metal bits of debris rather heavily with Blazing Orange to simulate rust. Highlight the rocks in streaks with 1:1 Adeptus Battlegrey:Astronomicon Grey and then edge highlight them with pure Astronomicon Grey.


6) Wash the base with 1:1 Devlan Mud:Water wash. The trick here is to put a blob of pure Devlan Mud on the base and then spread it out with water to create more random lighter and darker patches of ground.


7) When the wash is dry paint any crystals with Liche Purple and then highlight with 2:1 Liche Purple:Tentacle Pink (you can make Tentacle Pink by adding Space Wolf Grey to Liche Purple). Make sure to add some crystal light retraction streaks on each facet. Successively highlight this with 1:1 Liche Purple:Tentacle and then pure Tentacle Pink. Thinly glaze the crystals with 1:1 Leviathan Purple:Water to blend the highlights together.


8) Add fine spot highlights to the crystals with pure Skull White. Add a few random Boltgun Metal chips to the debris to simulate newer chipping.


9) Paint the rim of the base Chaos Black, and pin the model in place. Then when dry coat with clear Matt finish if you prefer to do so. Yes, the one at the bottom left is ready to have the miniature pinned on.

10) Lastly pick out the crystals with clear gloss varnish.


'Lost Empires' Bases

This is a fast and relatively good looking method I developed to paint these bases when I realised I had over four hundred Skitarii miniatures to put on bases. Because of the rapid nature of painting these there are a few steps missing photos, sorry for that.
For best results the bases are painted separately from the miniatures as mentioned in this post:


1) Wash the stone blocks and on patches on the gravel with 1:1:4 Asurmen Blue:Reaper Deep Ocean:Water.


2) Drybrush heavily with Deneb Stone.


3) Drybrush with P3 Morrow White.

4) Redefine some wash patches with Step 1 wash mix.


5) Wash gravel bits with 1:1 Devlan Mud:Water mix.

6) Pick out details with Reaper Deep Ocean.

7) Highlight details with Reaper Marine Teal.

8) Wash any black details twice with pure Badab Black.


9) Paint the rim of the base Chaos Black, and pin the model in place.

10) Coat the mini with clear finish and you are done.


So there you have it, an easy way to paint two of the available sets of bases from Dragon Forge.

Until next time
Cheers
Subby out


Related Posts:

Wednesday, January 25, 2012

WIP Coteaz Part 2

Continuing my running series after a bit of late night painting last night and tonight I managed to get the armour and cloak finished on Coteaz. It is a struggle getting the washes done because it is raining here at the moment and so the humidity is making them take forever to dry. Oh well that is life. On with the Show!
These next couple show him with his cloak finished, leaving me all the other bits to go. I chose purple for two things. First it goes well with the Turquoise armour and secondly it is a colour related to Royal or Imperial Power, thus making Coteaz's ties to the Throne of Terra more obvious.

I used the following technique to paint the Purple Cloak on Coteaz:
1) Over a Black undercoat layer Liche Purple.
2) Wash twice with 1:3 wash of Badab Black:Leviathan Purple.
3) Layer highlight with Liche Purple.
4) Wash with 1:1 Water:Leviathan Purple.
5) Layer highlight with 1:1 Liche Purple:Warlock Purple.
6) Layer highlight with 1:1:1 Liche Purple:Warlock Purple:Morrow White.
7) Layer highlight with 1:1:2 Liche Purple:Warlock Purple:Morrow White.
8) Final wash glaze with 1:1 Water:Leviathan Purple.


Cheers till next time
Subby out.


Monday, January 23, 2012

WIP Coteaz and Grey Knights Project

Continuing the Trend that I began with the Doomknight and Landraider I wanted to get myself re-enthused with the hobby. Having a couple of days free per week now, I have a bit of a chance to get some work on my Grey Knights.

So the other day I decided to unpack and check out exactly what I have in the cupboard for the army.
The Minitures I have to work with so far are as follows:
2 x Brother Captain Stern (White Metal) (Will be converting one into Drago for a bit of fun options)
24 x GKs Terminators (White Metal) (5x 3/4 painted)
38 x GKs Power-Armoured (inc 5x Plastic MPK minis)
42 x Adeptus Arbites (Counts as Warrior Acolytes)
6 x Arbites Cyber Mastifs (Counts as Arco-Flagellants)
1 x Inquisitor Coteaz (White Metal, Cleaned, Currently being painted)
1 x Inquisitor (White Metal)
2 x Gun Servitors (White Metal) (1x Painted)
2 x Death Cult Assassins (White Metal) (Cleaned ready to paint)
16 x Inquisitorial Warband Assorted (White Metal)
1 x Vindicare Assassin (White Metal) (cleaned, recently paint stripped)
1 x Eversor Assasin (White Metal)
1 x Grey Knights Venerable Dreadnought (Converted Plastic Ven-Dread, Painted and Finished)
2 x Nemesis Dreadknights
1 x Land Raider Redeemer (Forgeworld Parts, Converted)
1 x Stormraven Gunship (Converted Pilot, magnetised weapon options, partially painted)

So Yeah I have a little bit of work ahead of me.

And while looking for Grey Knights Epic Miniatures (yes for madness.... MADNESSSS.....!!!), I found the following Inquisitor Coteaz miniature for sale.
For a long time I have put off painting my Coteaz miniature because I didn't want to do the traditional colour scheme for him. So this caught my interest, as it was both different and well executed. However I like to use somewhat darker colours, especially on characters who have questionable morality. Yes I know very grim dark....
So yesterday after lunch with the girlfriend I stopped at the not so local friendly gaming store to do a bit of painting (here-after NSLFGS). Ostensibly I was to have a night off and had planned to make it to Pubhammer that evening (yes my gaming club runs its meeting in a pub!), but at around 3:30 I got the call to see if I wanted a shift so I only got this far with Coteaz. Not I could have said no to the shift and kept painting, but hell extra money is always good.
Anyways I used the following technique to paint the armour:

Turquoise Blended Armour:
1) Undercoat Black
2) Base colour all the armour Reaper 'Deep Ocean'
3) Wash armour with 1:1:1 Asurmen Blue:Thraka Green:Badab Black
4)Wet Blended highlights with Reaper 'Deep Ocean'
5)Wet Blended edge highlights with Reaper 'Marine Teal'
6) Spot Highlights with 1:1 Reaper 'Marine Teal':P3 'Morrow White'

If in Stage 4 you let the highlights get to wide you can re-blend into the darker shading using glazes of the wash from Stage 3.

Lastly I will be putting all of these on Dragon Forge 'Parched Earth' Bases. :D

So there you have it.
Cheers All
Happy Chinese New Year!

Subby


Related Posts:

Sunday, December 12, 2010

To Dark Eldar or Not to Dark Eldar: Part One, Conception

So the new Dark Eldar Models are nice, but I alrady have half an Eldar Army Sitting the the cupboard unassembled that really deserve some attention. But I wanted to paint a few Hellions and some of the plastic Witches will be converted into smick Dark Elf Witches for my fanatasy army. It goes without saying that I already bought the new Lilith miniature, as it is the first GW miniature that has made my list of must have figures in nearly ten years.
Those who know me know I buy a lot of GW miniatures will be crying "Subby, how did it make your must have list, and what is your must have list anyways?"

Truth is I enjoy painting and modelling more than gaming. And occasionally I will see a model that I must own, not to game with, but to paint up to a really high standard for the display case.
Very few Games Workshop miniatures make the cut. Not because they aren't good miniatures, but it is not often these days I see one of their miniatures and go "Wow, that is beautifully executed and will be a challenge to paint well."

Similarly when I saw the new Hellions I immediately like the kit, for the execution of the design of the plastics. So I resolved to get some eventually. Looking closely at the sprues when they landed at my FLGS I could see they were well detailed and would assemble remarkably well/easy. But in the back of my mind I knew I had some Eldar miniatures, bought cheap at auction and hidden away on my to-do list.

The thing is I really am not that enthused with the colours presented by Craftworld Eldar, having first come in contact with Eldar in the heady days of Rogue Trader. Time for the waaaay-back machine....

Image shamelessly borrowed from GW, courtesy of Collegia Titanica

The lurid colours and mercenary nature of the Old Eldar was appealing but at the time Marines were firmly in my grasp and at a young age where pocket money and moving lawns was the fuel behind my income I could only afford one army. So Eldar never happened.

Now I have some minis laying around I was thinking the other day about painting a few Eldar, or maybe the starting on Lilith to take a break from all the Tiny German tanks I have been cleaning and doing test painting on (FoW has landed at the club so I dug out my 10mm stuff for paint scheme testing). On top of that I was sick all week with little else to do so with my mind wandering I came upon this post by Dave T over at FTW. In the comments there was discussion over adapting it to different colour schemes. I was thinking of doing a couple of test miniatures in various colours when a little light appeared over my head and it was on like Konkey Kong!

See I have some Harlequins from the same auction where I obtained the Eldar, and I thought back to the RT days where whole Eldar armies were given lurid colour patterns. The idea that was spawned is as follows.
What if a Harlequin troupe turned their backs upon tradition, collected a motley assortment of like minded Eldar (both Normal and Dark), and turned to raiding as they started a descent towards chaos.

I didn't know if it was original or not, but it was cohesive enough that I wouldn't get blank looks of mental failure when/if I ever took them to a tournament. I aimed for a 1750pts list, randomly selected to my taste, because winning games is not the foremost worry in my hobby life but rather painting cool stuff. The list remains unwritten however but at the moment I have yet to dig out the minis and write up what I have.

In the end I could take my time and paint lots of different colours across the army, with the bases linking them all together. Additionally if I used counts as units of Eldar minis with suitable small conversions then more than half my army is already in my hands. While largely long term the project should be fun, and will give me something to break up the monotony of the other painting projects on the bench (notably 38 Grey Space Wolves, the Remaining 10 Novamarines, 30 10mm Scale German tanks with about 150 infantry, and my 300+ Skitarii in all their black and red finery, not counting all the other stuff hiding in the cupboard).

I did want to fill out the army with some suitable Dark Eldar miniatures and thought the best place to start would be some of the new Hellions. This was for several reasons. First they are really nice miniatures. Second the sky-boards would provide a large enough canvass to test out a few of the patterns and freehand stuff I wanted to do. Third regardless of if I used the Eldar of Dark Eldar Codex they would have a use as it is not a serious stretch of the imagination that they could substitute for Swooping Hawks.

So to this end I rang my favourite local place to buy hobby stuff Ace Comics and Games at Annerly to find out if they had some on shelf (a solid yes), and thus added them to my list of destinations while doing the road-trip Saturday to various places that need visiting for work and hobby. I started the assembly/painting of them last night while waiting for some work stuff to arrive via the interwebs.

Coming soon
Part Two: Painting Tutorial => Hellion Sky-boards
Aka: Alternate Colours and Easy Dark Eldar highlighting methods.

Monday, November 8, 2010

Auctions Ahoy!

Heyo!
Well I am selling some stuff on Ebay, some new, some older and a few items that are OOP.

check out my stuff over at this here link.

I have posted this while still adding stuff so if you check back again in a couple of hours there should be even more stuff up.
Been cleaning up in preparation for my big move, so there may be other stuff still to come later in the week too.

I have been rounding up the last of the Novamarines, just one squad to go before the whole army is done. So hope fully I will have a chance to snap some good photos over the course of the week.

Also the rumours are true. I will being going away for work for an indeterminate period after the end of this month soooo posts may be few and far between.

Wednesday, September 1, 2010

Quick Commissions


Sometimes you need a little something to break the tedium of painting and sculpting, something you have not done in a while.
For me it came this last week in the form of a quick little commission from a gamer at the FLGS.
More particularly they wanted me to colour match some minis to an already painted army that he did not paint himself.

OK so it took a little experimentation but in the end I nailed it. Happy client, more minis on the way from him (actually about another 8 to be precise).

here are a few quick snaps of the first cab off the ranks. His Defiler for his Chaos renegades force. I do apologize for the photo quality, these were hastily snapped at the FLGS before the client headed home with it. If you want a closer look the larger sized pics can be found in my Deviant Art Account Galleries, as I try to keep file sizes and load time down for my fellow bloggers.

The Front

The Back

Left Side

Right Side

From the top down

So this lifted my spirits a bit, sometimes you just need a break from one thing for a while to another.

Tuesday, August 31, 2010

Best Idea Ever!!!


Got Sprue?!?
Just a little something quick I wanted to share.
I was surfing the Wargames Factory website and noticed something down at the bottom of their pages in the links section.


Ok so if like me you are intrigued I suggest taking a look. Finally someone has taken the initiative to recycle all those leftover sprue that we all have. On top of that you can get free stuff every month!!

I don't know about you but helping the environment seems like a good idea, but to get a chance to get free stuff out of it is better than any carbon trading fiasco I have ever heard of.

Kudos to the Wargames Factory guys for taking the initiative.

As an addendum; anyone who has white-metal off-cuts, or chunks of vents, I would be glad to take them off your hands for recycling.

and how did those conversions I mentioned in my last post turn out?
well one snap of a painted dude is right here (although it was rushed so terrible focus quality).
Yeah I know this is just a kitbash of a Valk door gunner body with a set of command squad box arms and a head from the Shock Troopers, but I have discovered that Cadian arms go straight onto a Shock Trooper body with very little fuss.

Saturday, May 1, 2010

Can You Name That Theme Song? - FTWCP


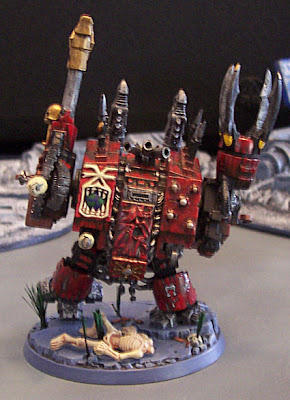
This is a Happy Khorne Dreadnought...

Why is this KD so happy? Why does he have his hands thrown in the air in praise to the Dark Gods?
Because He gets to come out of the Gaming Case to kick off this post about choosing a theme for your army. This dreadnought, that I put together and converted when the plastic dreads were first released, shows a few important things about theme.

1) You can easily use random bits, green stuff and some plastic-card to convert a vehicle to match up with the theme of your army. Once you do this you can then quickly paint it to match the paint scheme.

2) You don't have to neglect the base, even if it is pre-molded.

In this instance I have added a slightly modified Skeleton to complete the skull that was on the base to begin with. I also added some grass made from old paint brush hairs to break up the whole thing with some spot colors.

Below I will give examples of both of these methods and various combinations of the two. Including the extension of these methods to objectives and Game Specific miniatures.


This Red Corsairs Rhino shows another way to enhance the theme of your army. While not extensive the conversions make this miniature unique. While I have scratch built this particular bit of Red Corsairs Iconography from plastic-card there are many upgrade kits out there to add similar bits to you miniatures to make them yours. While I could have painted this on (indeed I painted a larger one on the top hatch), I thought it would stand out more if I did it this way.

Moulded details, brass etch bits and themed conversions can be easily used to quickly make an army yours. I many cases these details can also make the miniatures both easier to paint, and you can add extra painted detail to the raised parts without fear of messing up the other details.

This is SGT Cromarte, named for the eponymous school teacher terminator from the TV Series. He started as an off hand remark and was made reality with a head swap and some icon filing. He was painted to to match the scheme for the rest of my scouts. Here the theme of the character is derived from the fluff behind the rules. He represents a hard-bitten veteran who has seen some serious action (represented by his bionics and old school rank insignia), that has been tasked with training the new recruits. A simple slate base with some muted greys and a gaunt skill add to the look by making it look like his camo cloak really would help conceal him.

Here is Cromarte with a few of his WIP pals. If you look at the middle mini you will notice a chunk of Cities of Death building. Small off-cuts and other bits that you would otherwise not use can be quickly used to add character to your bases. In this case I am steadily re-doing my whole marine army (except my Deathwatch Kill Team), in bases that suit my city terrain. As the scouts are newer additions to my marines they get the whole treatment from the start, the rest will get soaked in water until the white glue is soft enough to remove the old flock. They will also get updated highlights and some paint re-touches.

Doing it this way can revive your interest in an army you may have otherwise abandoned for various reasons. In my particular case my marines were never really themed other than "Vanilla" Marines that I use to learn the new rules with each Edition. This way it will encourage me to game more often with them, and I can revisit some of my favourite miniatures without buying a whole new army. On top of that it encourages me to get the crew over more often to game with my terrain, rather then meeting at our not-so-local-friendly-gaming-store.

The scout on the right is the result of my need for just one more scout to finish the army. In this instance I had a couple of choices. I could have sculpted a pair of legs, as I had the rest of the body as leftover bits. Instead I chose to do a neat little theme base where the scout appears to be climbing out of some industrial piping after cutting the mesh covering open.

Here is an example of basing two different armies the same to suit a purpose. In this case the Deathwatch Brother Captain on the left has a resin base from Back-2-Base-ix. The Genestealer on the right has a plastic base that has had textured plastic-card added to match the resin one. Both have been painted as if they were on starship. I themed these bases this way because these models are used as alternate forces for both Kill Team and Space Hulk. As per my previous example with the scouts I have themed that bases to match the majority of the terrain they will be used upon. This isn't to say that these models would be out of place on a Cities of Death or Necromunda table either.
The strategic application of scratch built bases to match some resin ones that you have run out of, especially if the amount you need is less then one packet of resin ones, will keep money in your pocket. I will also save you the headache of trying to work out what to use the, now excess, resin bases for.

Pre-cast bases such as the one on this Forgeworld Moderati need not be boring. A simple addition of some flock, in this case some snow flock, in addition to some strategic washes can really bring a little theme or story to life.
This guy and his two friends I use as objective markers. The theme is that they have just climbed out of the wreck of their steed and the oil and other hot fluids have stained the snow he is walking across. Simple little themes like this can be conveyed by strategic use of the base to create micro-dioramas.

In my last post I showed this guy. Here I have have used the light colours of the base to counter-balance the dark colours of the Skitari. Also the theme of ancient unexplored ruins presented by the design of the bases brings to mind the omnipresent background theme of the Adeptus Mechanicus searching ruins for lost STC fragments.

A close-up of one of the weapons platform sized resin bases from Dragonforge, the strategic use of symbols on bases can also add to the them of your army. If you regularly face a particular opponent or army you can add little bits of their icons and armour to your bases for a bit of fun. Both players could even use these like kill markings, adding one every time a mini "kills" a character or special unit. Just a little fun added into the game for everyone that can bring hobby back to rewarding those "Cool" moments that good gamers have during games.

Here are the rest of the bases ready to have Skitarii mounted on them, using the same set of resin bases for the whole army makes sense as no matter how incongruous the units are, the bases will tie the army together thematically. When doing this, especially if using the counter-balance of colours method, it is often a good idea to paint the bases separate from the minis. Barring any elaborate posed that require the minis to be on their bases, it can make the painting quicker as you need not worry so much about "not keeping to the lines."

Lastly here is a group shot of my Thousand Sons Army. This is diametrically opposed in how the army is themed to the last example. Here the theme of the miniatures has dictated the choice of both the force composition and the bases. Theme armies like this, and any cult army is especially susceptible to this path, are built around the colour scheme and army choices. However, in keeping with the sorcerous theme, the bases have been basically sanded and painted in dark browns and blacks to represent land blasted by the unnatural energies of the warp.


So I leave you with a few tips and things to ponder about theme and armies. Hope you enjoy.
A big thanks to Ron for sending this topic out as I had been thinking about this for a while and wondered if I should write it down.

A also want to apologise for the poor quality of some of the pictures in this post, my digital camera's auto focus was playing up today, I may have to get it looked at.

Wednesday, April 21, 2010

Warlord Titan Project Progress

Truth be told this has been a WIP draft for about a week and a half, it just never seemed to get finished. Here are a few of the reasons why:
I went to Supanova Brisbane and had my cousin stay over for a few days. This ate up a bit of time on things and as I was flat out all weekend i was ludicrously tired and only had a little time to do a few production sketches. Last weekend was the ANZAC Day weekend, so while I did spend some time painting and modelling on the Saturday and Monday, the lads and I went out to see "Beneath Hill 60" on the Sunday, which was a really great film to remember those who fought for us. I also raised more than a few drinks to their memories on the Friday night a 21st party. Lets just say the the painting on Saturday started slooowly.

Work is steadily progressing on the Titan. So far I have the toe design nailed and the first toe three parts done so I can cast the 24 I need (6 toes on each foot, 2 titans) and I refined the lower leg design. I also did the designs for the Gattling Blaster, Apacalypse Launcher, the Core cutouts of the torso, and started on the I have bought all the fittings and LEDs for the builds as well as the plastics and other bits I needed.

I have started posting WIP CAD layouts of the beast on my Deviant Art Account. I did this for two reasons; 1) I had been neglecting it a little. 2) I don't use a whole swag-load of my file limits on here or my website.
So if you want to see how things are going with that you can go here.

A sample of the Cad Stuff

I also bought some bases from Jeff Dragonforge, specifically some of his wonderful Lost Empires Bases, which I think would go perfectly with my lost-technology-hunting-Titan-escorting Skitarii. They arrived about a week and a half ago So far I have the whole lot ready to put miniatures onto. Below is my test mini mounted on his new permanent residence...

(for a larger pic you can visit my Deviant Art account)

This is after about ten years of actually owning guard miniatures (yes I have a bunch of metal Cadians, Stormtoopers, and some Steel Legion minis, plus the plastic Cadians that this mini is taken from), I have found a color scheme I actually like. I plan to doo the whole lot up like this. Plus most of the other minis in this lot will have re-breathers, goggles, bionics and other conversions to make them a fair but less like freshly recruited Skitarii.

I really wanted to get this out before I posted my contribution to the latest collaborative post for FTW. Just in case you were wondering why the two posts in a day...

Tuesday, January 12, 2010

Secret Men's Business

Generally during you holidays you would say take a bit of time off, me not so much. I have been a little lax in my posting since the holidays started. Still there are a few good things going on at the DSM homebase.

Firstly I got a new glass display cabinet for the sculpting room (although it often gets reffered to as "the Man Cave"!). I haven't finished filling it but this pic was snapped in mid December so there are a few more finished minis in there now.

Another important event that recently occurred was the rebuilding of the front hubs in the ol' Cruiser (affectionately referred to as the Battle Bus). We did the wheel bearings, king pin bearings, seals in the ends of the axles and the felts in the swivel housings. It was hot sweaty word but it was worth it cause now you can't smell swivel housing grease after a drive to the FLGS. The only advice I can offer about this is make sure you have two people doing the job, one of whom has done it before. I got the Old Man to give us a hand, and it took us about six hours to do both sides.


I started another project, it is super secret and you can see a WIP shot below. I will have this done in the next day or so (up to the painting part atm). Can you guess what it is?

The "Dude a Day Challenge" I set myself was successful, I manage to paint 42 points worth of minis in December around all the other stuff that went on. I even got my Ironclad Dread conversion painted for his birthday (Boxing Day).

I also have got in some time working on a pst for Ron over at FTW, I have a few chems to wet test and a bit of typing and it should be read to wing its way to him.

Lastly as a quick tip, when buying timber to make anything make sure you plan ahead! Don't get half into a job and discover you are short because you didn't CAD up the job beforehand (Like I usually would).

Cheers All
and a Happy belated New Year

Subby