Showing posts with label Dragon Forge. Show all posts

Thursday, April 26, 2012

Dragon Forge Bases Tutorial

Painting Dragon Forge 'Lost Empires' and 'Parched Earth' bases.


Continuing my irregular series about bases, basing and well general tips I will take you through the process I use to paint the two types of bases I use. I use these for my Grey Knights and Skitarii respectively, however at some point I am going to modify some to combine elements of the two so it doesn't look weird if I field the two armies together in an Apocalypse game. Also you may notice that I use, almost exclusively, the old GW paint colours. Feel free to swap them for their current near match brethren.
So leading Straight on from this post:
At this point you should have your bases cleaned and primed, as per my previous post. From here I am going to walk through the steps I take to paint the two types of bases.


First up the 'Parched Earth' bases:

This method is a fairly fast way to paint these well balanced and very detailed bases. I chose to do them slightly darker tones to balance out the bright steel, white and red colours that dominate the colour scheme of my Grey Knights. To make them more traditional sulphur desert coloured you could perhaps swap the Charadon Granite for Iyanden Darksun and the Devlan Mud for Gryphonne Sepia.


1) Thin down some Charadon Granite so that it is about the same consistency as paint you would airbrush with. Liberally wash this into the cracks in the base. Once this is dry sticky brush the base with 1:2 Reaper Dark Blood:Charadon Granite (Base Mix).


2) Sticky brush the base with 1:2 Deneb Stone:Base Mix.


3) Heavily Drybrush patches with 2:1 Deneb Stone:Charadon  Granite. The Idea here is to add natural looking changes to the colour of the ground just like real soil. Final Drybrush highlight in patches with Deneb Stone.


4) Paint any metal junk with Boltgun Metal and pick out any rocks with a Heavy Drybrush of Adeptus Battlegrey.


5) Stipple the metal bits of debris rather heavily with Blazing Orange to simulate rust. Highlight the rocks in streaks with 1:1 Adeptus Battlegrey:Astronomicon Grey and then edge highlight them with pure Astronomicon Grey.


6) Wash the base with 1:1 Devlan Mud:Water wash. The trick here is to put a blob of pure Devlan Mud on the base and then spread it out with water to create more random lighter and darker patches of ground.


7) When the wash is dry paint any crystals with Liche Purple and then highlight with 2:1 Liche Purple:Tentacle Pink (you can make Tentacle Pink by adding Space Wolf Grey to Liche Purple). Make sure to add some crystal light retraction streaks on each facet. Successively highlight this with 1:1 Liche Purple:Tentacle and then pure Tentacle Pink. Thinly glaze the crystals with 1:1 Leviathan Purple:Water to blend the highlights together.


8) Add fine spot highlights to the crystals with pure Skull White. Add a few random Boltgun Metal chips to the debris to simulate newer chipping.


9) Paint the rim of the base Chaos Black, and pin the model in place. Then when dry coat with clear Matt finish if you prefer to do so. Yes, the one at the bottom left is ready to have the miniature pinned on.

10) Lastly pick out the crystals with clear gloss varnish.


'Lost Empires' Bases

This is a fast and relatively good looking method I developed to paint these bases when I realised I had over four hundred Skitarii miniatures to put on bases. Because of the rapid nature of painting these there are a few steps missing photos, sorry for that.
For best results the bases are painted separately from the miniatures as mentioned in this post:


1) Wash the stone blocks and on patches on the gravel with 1:1:4 Asurmen Blue:Reaper Deep Ocean:Water.


2) Drybrush heavily with Deneb Stone.


3) Drybrush with P3 Morrow White.

4) Redefine some wash patches with Step 1 wash mix.


5) Wash gravel bits with 1:1 Devlan Mud:Water mix.

6) Pick out details with Reaper Deep Ocean.

7) Highlight details with Reaper Marine Teal.

8) Wash any black details twice with pure Badab Black.


9) Paint the rim of the base Chaos Black, and pin the model in place.

10) Coat the mini with clear finish and you are done.


So there you have it, an easy way to paint two of the available sets of bases from Dragon Forge.

Until next time
Cheers
Subby out


Related Posts:

Saturday, May 1, 2010

Can You Name That Theme Song? - FTWCP


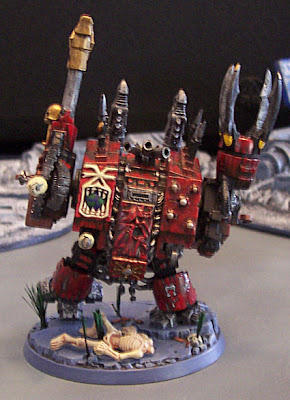
This is a Happy Khorne Dreadnought...

Why is this KD so happy? Why does he have his hands thrown in the air in praise to the Dark Gods?
Because He gets to come out of the Gaming Case to kick off this post about choosing a theme for your army. This dreadnought, that I put together and converted when the plastic dreads were first released, shows a few important things about theme.

1) You can easily use random bits, green stuff and some plastic-card to convert a vehicle to match up with the theme of your army. Once you do this you can then quickly paint it to match the paint scheme.

2) You don't have to neglect the base, even if it is pre-molded.

In this instance I have added a slightly modified Skeleton to complete the skull that was on the base to begin with. I also added some grass made from old paint brush hairs to break up the whole thing with some spot colors.

Below I will give examples of both of these methods and various combinations of the two. Including the extension of these methods to objectives and Game Specific miniatures.


This Red Corsairs Rhino shows another way to enhance the theme of your army. While not extensive the conversions make this miniature unique. While I have scratch built this particular bit of Red Corsairs Iconography from plastic-card there are many upgrade kits out there to add similar bits to you miniatures to make them yours. While I could have painted this on (indeed I painted a larger one on the top hatch), I thought it would stand out more if I did it this way.

Moulded details, brass etch bits and themed conversions can be easily used to quickly make an army yours. I many cases these details can also make the miniatures both easier to paint, and you can add extra painted detail to the raised parts without fear of messing up the other details.

This is SGT Cromarte, named for the eponymous school teacher terminator from the TV Series. He started as an off hand remark and was made reality with a head swap and some icon filing. He was painted to to match the scheme for the rest of my scouts. Here the theme of the character is derived from the fluff behind the rules. He represents a hard-bitten veteran who has seen some serious action (represented by his bionics and old school rank insignia), that has been tasked with training the new recruits. A simple slate base with some muted greys and a gaunt skill add to the look by making it look like his camo cloak really would help conceal him.

Here is Cromarte with a few of his WIP pals. If you look at the middle mini you will notice a chunk of Cities of Death building. Small off-cuts and other bits that you would otherwise not use can be quickly used to add character to your bases. In this case I am steadily re-doing my whole marine army (except my Deathwatch Kill Team), in bases that suit my city terrain. As the scouts are newer additions to my marines they get the whole treatment from the start, the rest will get soaked in water until the white glue is soft enough to remove the old flock. They will also get updated highlights and some paint re-touches.

Doing it this way can revive your interest in an army you may have otherwise abandoned for various reasons. In my particular case my marines were never really themed other than "Vanilla" Marines that I use to learn the new rules with each Edition. This way it will encourage me to game more often with them, and I can revisit some of my favourite miniatures without buying a whole new army. On top of that it encourages me to get the crew over more often to game with my terrain, rather then meeting at our not-so-local-friendly-gaming-store.

The scout on the right is the result of my need for just one more scout to finish the army. In this instance I had a couple of choices. I could have sculpted a pair of legs, as I had the rest of the body as leftover bits. Instead I chose to do a neat little theme base where the scout appears to be climbing out of some industrial piping after cutting the mesh covering open.

Here is an example of basing two different armies the same to suit a purpose. In this case the Deathwatch Brother Captain on the left has a resin base from Back-2-Base-ix. The Genestealer on the right has a plastic base that has had textured plastic-card added to match the resin one. Both have been painted as if they were on starship. I themed these bases this way because these models are used as alternate forces for both Kill Team and Space Hulk. As per my previous example with the scouts I have themed that bases to match the majority of the terrain they will be used upon. This isn't to say that these models would be out of place on a Cities of Death or Necromunda table either.
The strategic application of scratch built bases to match some resin ones that you have run out of, especially if the amount you need is less then one packet of resin ones, will keep money in your pocket. I will also save you the headache of trying to work out what to use the, now excess, resin bases for.

Pre-cast bases such as the one on this Forgeworld Moderati need not be boring. A simple addition of some flock, in this case some snow flock, in addition to some strategic washes can really bring a little theme or story to life.
This guy and his two friends I use as objective markers. The theme is that they have just climbed out of the wreck of their steed and the oil and other hot fluids have stained the snow he is walking across. Simple little themes like this can be conveyed by strategic use of the base to create micro-dioramas.

In my last post I showed this guy. Here I have have used the light colours of the base to counter-balance the dark colours of the Skitari. Also the theme of ancient unexplored ruins presented by the design of the bases brings to mind the omnipresent background theme of the Adeptus Mechanicus searching ruins for lost STC fragments.

A close-up of one of the weapons platform sized resin bases from Dragonforge, the strategic use of symbols on bases can also add to the them of your army. If you regularly face a particular opponent or army you can add little bits of their icons and armour to your bases for a bit of fun. Both players could even use these like kill markings, adding one every time a mini "kills" a character or special unit. Just a little fun added into the game for everyone that can bring hobby back to rewarding those "Cool" moments that good gamers have during games.

Here are the rest of the bases ready to have Skitarii mounted on them, using the same set of resin bases for the whole army makes sense as no matter how incongruous the units are, the bases will tie the army together thematically. When doing this, especially if using the counter-balance of colours method, it is often a good idea to paint the bases separate from the minis. Barring any elaborate posed that require the minis to be on their bases, it can make the painting quicker as you need not worry so much about "not keeping to the lines."

Lastly here is a group shot of my Thousand Sons Army. This is diametrically opposed in how the army is themed to the last example. Here the theme of the miniatures has dictated the choice of both the force composition and the bases. Theme armies like this, and any cult army is especially susceptible to this path, are built around the colour scheme and army choices. However, in keeping with the sorcerous theme, the bases have been basically sanded and painted in dark browns and blacks to represent land blasted by the unnatural energies of the warp.


So I leave you with a few tips and things to ponder about theme and armies. Hope you enjoy.
A big thanks to Ron for sending this topic out as I had been thinking about this for a while and wondered if I should write it down.

A also want to apologise for the poor quality of some of the pictures in this post, my digital camera's auto focus was playing up today, I may have to get it looked at.

Wednesday, April 21, 2010

Warlord Titan Project Progress

Truth be told this has been a WIP draft for about a week and a half, it just never seemed to get finished. Here are a few of the reasons why:
I went to Supanova Brisbane and had my cousin stay over for a few days. This ate up a bit of time on things and as I was flat out all weekend i was ludicrously tired and only had a little time to do a few production sketches. Last weekend was the ANZAC Day weekend, so while I did spend some time painting and modelling on the Saturday and Monday, the lads and I went out to see "Beneath Hill 60" on the Sunday, which was a really great film to remember those who fought for us. I also raised more than a few drinks to their memories on the Friday night a 21st party. Lets just say the the painting on Saturday started slooowly.

Work is steadily progressing on the Titan. So far I have the toe design nailed and the first toe three parts done so I can cast the 24 I need (6 toes on each foot, 2 titans) and I refined the lower leg design. I also did the designs for the Gattling Blaster, Apacalypse Launcher, the Core cutouts of the torso, and started on the I have bought all the fittings and LEDs for the builds as well as the plastics and other bits I needed.

I have started posting WIP CAD layouts of the beast on my Deviant Art Account. I did this for two reasons; 1) I had been neglecting it a little. 2) I don't use a whole swag-load of my file limits on here or my website.
So if you want to see how things are going with that you can go here.

A sample of the Cad Stuff

I also bought some bases from Jeff Dragonforge, specifically some of his wonderful Lost Empires Bases, which I think would go perfectly with my lost-technology-hunting-Titan-escorting Skitarii. They arrived about a week and a half ago So far I have the whole lot ready to put miniatures onto. Below is my test mini mounted on his new permanent residence...

(for a larger pic you can visit my Deviant Art account)

This is after about ten years of actually owning guard miniatures (yes I have a bunch of metal Cadians, Stormtoopers, and some Steel Legion minis, plus the plastic Cadians that this mini is taken from), I have found a color scheme I actually like. I plan to doo the whole lot up like this. Plus most of the other minis in this lot will have re-breathers, goggles, bionics and other conversions to make them a fair but less like freshly recruited Skitarii.

I really wanted to get this out before I posted my contribution to the latest collaborative post for FTW. Just in case you were wondering why the two posts in a day...

Monday, October 26, 2009

Hazzah! Email back online.


Well from my last post you all would know that my email account got hacked. Well Microsoft managed to pry it open like an Ork with a power-claw peels open a tank. So it is all fixed again, however for those who want to commission work from me be aware that I am not taking commissions until after I do three things.

1) Update Sub's Underground. It has been far too long and I have to add the links to the shop which is being built.

2) Organise the Shop. I.e. finish the first run of products and do some casting. Plus finish registering and building the secure shop.

3) Organise another secure email account For commissions. I will still take single miniature commissions when I get the shop up and running, but it will not be a constant thing.

I realise that most of those reading this will think, commissions, wtf?
Brisbane locals who I have done work for will already know the low-down.

You may wonder to yourself, "what will this store sell?" Well not resin bases. Firstly there are too many people out there who are both members of FTW and better base designers than me making resin bases. If you are looking for good bases I can recommend you check out the List of stores on FTW. My personal picks of the bunch (in no particular order), are Dragon Forge, Secret Weapon Miniatures and for Aussies who want to pay a little less shipping, Back2Bas-ix.
As to what I will have, mostly 28mm scale generic conversion stuff. Things that enable you, the
modeller, to build cooler conversions by giving you a wider range of bits.
I will also do limited runs of 28mm scale miniatures in resin, yeah I know you are thinking "how limited?"
If they sell well enough I will likely do white metal versions with slight changes to the sculpts/more options on the sprue. Some of these miniatures may come with resin bases, as needs suit, but generally they will come with generic plastic bases (if I can find a good source of plastics).

So basically that is all the news. without further ado I give you two pics of some minis I did a while ago (found these while cleaning my hard-drive to determine if it was a virus or trojan that lead to
email fail)
A Kroot/Chaos Hound Conversion (can you pick the reference?)
And the Masque of Slaanesh I painted for the Chaos Daemons Dex Launch Painting Comp
although for some reason the masque pic is resized by the blogger software sigh!

Cheers
Subby